Installing and Configuring Nextcloud on CentOS 7
Introduction
Nextcloud is a file sharing server that permits you to store your personal content, like documents and pictures, in a centralized location, much like Dropbox. The difference with Nextcloud is that it is free and open-source, which allows anyone to use and examine it. It also returns the control and security of your sensitive data back to you, thus eliminating the utilization of a third-party cloud hosting service.
Prerequisits
- A user with sudo priveleges is necessary.
- A LAMP (Linux, Apache, MySQL, and PHP) stack: Nextcloud requires a web server, a database, and PHP to function properly. Setting up a LAMP stack server fulfills all of these requirements.
yum install epel-release
rpm -Uvh https://mirror.webtatic.com/yum/el7/webtatic-release.rpm
Install Apache
sudo yum install httpd
sudo systemctl start httpd.service
sudo systemctl enable httpd.service
Apache should be installed and the service started on boot. To verify, one should be able to open a browser and go to http://your_server_IP_address/ and see the default Apache page.
Install MySQL (MariaDB)
yum install mariadb-server php70w-mysql
sudo yum install mariadb-server mariadb
sudo systemctl start mariadb
sudo systemctl enable mariadb.service
Now that our MySQL database is running, we want to run a simple security script that will remove some dangerous defaults and lock down access to our database system a little bit. Start the interactive script by running:
sudo mysql_secure_installation
The prompt will ask you for your current root password. Since you just installed MySQL, you most likely won’t have one, so leave it blank by pressing enter. Then the prompt will ask you if you want to set a root password. Go ahead and enter Y, and follow the instructions:
Enter current password for root (enter for none):
OK, successfully used password, moving on...

Setting the root password ensures that nobody can log into the MariaDB
root user without the proper authorization.

New password: password
Re-enter new password: password
Password updated successfully!
Reloading privilege tables..
 ... Success!
For the rest of the questions, you should simply hit the “ENTER” key through each prompt to accept the default values. This will remove some sample users and databases, disable remote root logins, and load these new rules so that MySQL immediately respects the changes we have made.
Now you need to enter the database and create a dedicated database for Nextcloud:
mysql -u root -p
CREATE DATABASE nextcloud;
REATE USER 'nc_user'@'localhost' IDENTIFIED BY 'YOUR_PASSWORD_HERE';
GRANT ALL PRIVILEGES ON nextcloud.* TO 'nc_user'@'localhost';
FLUSH PRIVILEGES;
When you’re done type Ctrl-D to exit.
Install PHP
sudo yum install php70w php70w-dom php70w-mbstring php70w-gd php70w-pdo php70w-json php70w-xml php70w-zip php70w-curl php70w-mcrypt php70w-pear setroubleshoot-server bzip2
This should install PHP without any problems. We need to restart the Apache web server in order for it to work with PHP.
sudo systemctl restart httpd.service
In order to test that our system is configured properly for PHP, we can create a very basic PHP script.
We will call this script info.php. In order for Apache to find the file and serve it correctly, it must be saved to a very specific directory, which is called the “web root”.
In CentOS 7, this directory is located at /var/www/html/. We want to put the following text, which is valid PHP code, inside the file:
<?php phpinfo(); ?>
If you are running a firewall, run the following commands to allow HTTP and HTTPS traffic:
sudo firewall-cmd --permanent --zone=public --add-service=http
sudo firewall-cmd --permanent --zone=public --add-service=https
sudo firewall-cmd --reload
Or if IPtables is used:
iptables -A INPUT -p tcp -m tcp --dport 80 -j ACCEPT
iptables -A INPUT -p tcp -m tcp --dport 443 -j ACCEPT
Now we can test whether our web server can correctly display content generated by a PHP script. To try this out, we just have to visit this page in our web browser. You’ll need your server’s public IP address again.
The address you want to visit will be: http://your_server_IP_address/info.php
This page should give you information about your server from the perspective of PHP. It is useful for debugging and to ensure that your settings are being applied correctly. You probably want to remove this file after this test because it could actually give information about your server to unauthorized users.
Installing NextCloud
With these step we download the software and extract it:
cd /var/www/html
curl -o nextcloud-13-latest.tar.bz2 https://download.nextcloud.com/server/releases/latest-13.tar.bz2
tar -xvjf nextcloud-12-latest.tar.bz2
mkdir nextcloud/data
chown -R apache:apache nextcloud
rm nextcloud-13-latest.tar.bz2
Now we need to create a new file in /etc/httpd/conf.d/nextcloud.conf and add the following lines:
Alias /nextcloud "/var/www/html/nextcloud/"

<Directory /var/www/html/nextcloud/>
  Options +FollowSymlinks
  AllowOverride All

 <IfModule mod_dav.c>
  Dav off
 </IfModule>

 SetEnv HOME /var/www/html/nextcloud
 SetEnv HTTP_HOME /var/www/html/nextcloud

</Directory>
Head to http://YOUR_IP_ADDRESS/nextcloud/ and you will be facing the following screen:
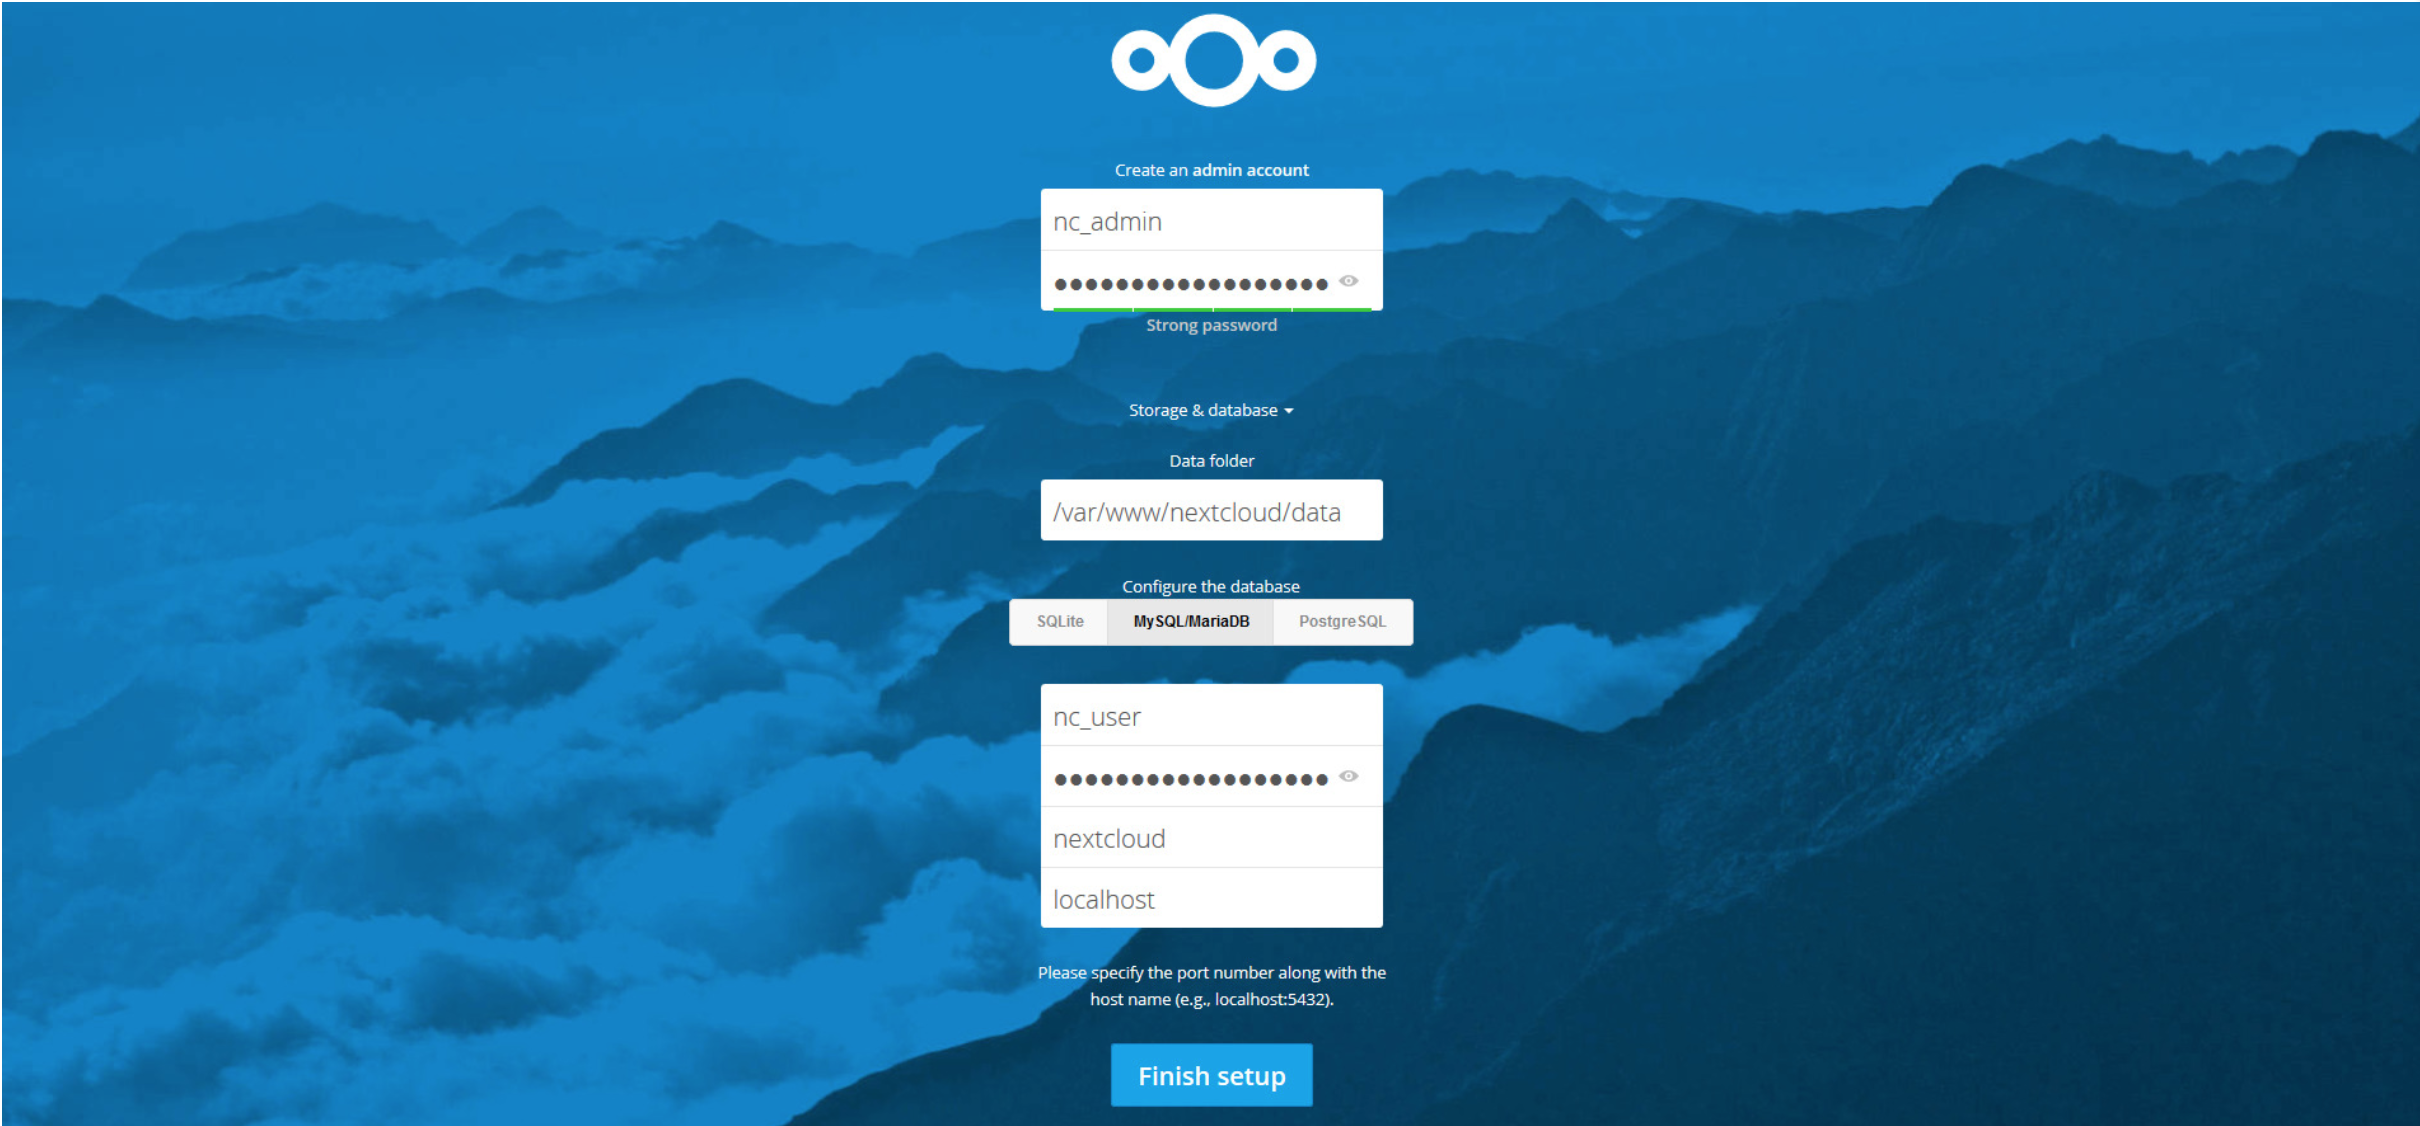
Select an administrator username and password. Then click on “Storage & Database“, here you can select the data folder, but if you don’t know what you’re doing it’s best if you leave it with the default value. Then select the MariaDB database. Fill everything and if you’ve followed all the steps correctly you should be seeing the Files app:

Configuring Single-Sign-On
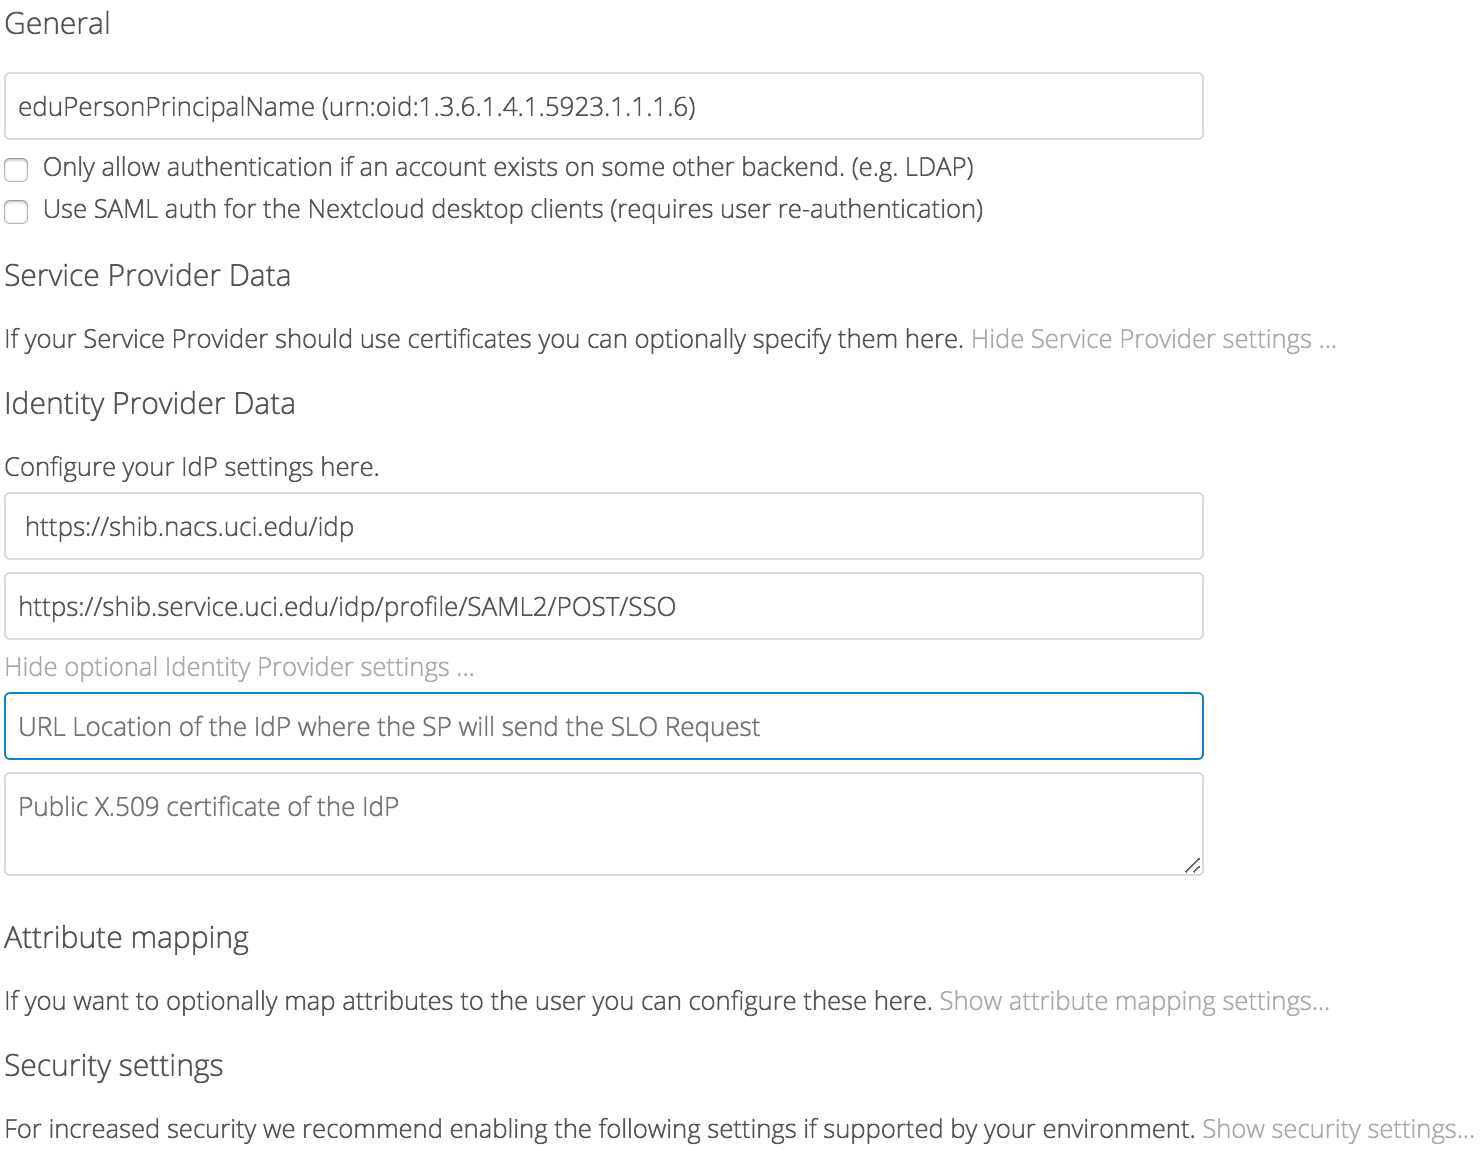
The “SSO & SAML” app has to be enabled. The app is part of the Nextcloud install package, but is disabled by default. To enable the app go to your Nextcloud Apps page. It can then be found in Nextcloud’s “SSO & SAML authentication” section. The form needs to be filled out as follows. In the field highlighted in blue, the SLO URL, you can use: https://shib.service.uci.edu/idp/profile/Logout?return_url=http://www.yoursite.com where the return_url points to where ever you want the user to end up after logging out.
Everyone with an UCI username and password should now be able to authenticate and use Nextcloud!
Testing Nextcloud Plugins
A number of potentially useful Nextcloud apps were tested, including:
○ File Access Control
○ Group Folders
○ Files Clipboard
○ Quota Warning
○ Ransomware protection
○ W2G2 - allows users to lock files and folders
○ User usage report
○ Circles
○ Impersonate
○ Retention
○ Full Text Search - ElastiSearch Platform
○ Ownbackup
○ Snapshots
○ No official Duo App but was able to configured dual authentication using FreeOTP
Some general impressions from using Nextcloud’s apps and marketplace are that not all apps are stable. When upgrading to the latest version of Nextcloud, some of the apps were automatically disabled, because they were not yet compatible with the latest NC version. App upgrades are typically straight forward and go without issues, but upgrades between major Nextcloud releases sometimes does not go as smoothly as hoped. Thus prior to any changes of the production level setup the modifications have to be first checked on an identical test setup.
Nextcloud vs ownCloud
Nextcloud is based on ownCloud. At the time or writing, the latest versions, Nextcloud v13 and ownCloud v10, are very similar in terms of prerequisits, installation process, code base, apps and modules, as well as the user interface. One major difference is that ownCloud has an Enterprise (paid) edition that has the SSO app. The standard ownCloud edition does not include the SSO module. Nextcloud has one code base, all open source. After installing ownCloud’s Enterprise edition, a considerable amount of time was spent with the ownCloud developers to debug the Shibboleth backend application. The setup is unnecessarily complex as described here: https://doc.owncloud.org/server/10.0/admin_manual/enterprise/user_management/user_auth_shibboleth.html
Support was not very responsive and the cost of ownCloud’s Enterprise edition is based on the number of users. For the expected number of UCI users, the cost for the Enterprise edition and support is relatively high.
References
https://www.marksei.com/install-nextcloud-13-centos-7/
https://www.digitalocean.com/community/tutorials/how-to-install-and-configure-owncloud-on-centos-7
https://docs.nextcloud.com/server/12/admin_manual/configuration_server/sso_configuration.html?highlight=ldap
https://apps.nextcloud.com/apps/user_saml
https://www.oit.uci.edu/idm/shibboleth/